
how to sharpen a chainsaw chain easily at home comes down to two things: matching the right file to your chain, and keeping your angles consistent so every cutter bites the same.
If your saw starts making dust instead of chips, pulls to one side, or needs extra pressure to cut, you are not “weak” or using the wrong technique, that chain is telling you it needs attention. Sharpening early is cheaper than running a dull chain until it overheats, stretches, or starts chewing up the bar.
I will walk you through quick ways to tell whether you should sharpen, what tools actually matter, and a simple filing routine you can repeat without guessing. You will also see when it makes more sense to replace the chain or ask a shop for help.
Why chainsaw chains get dull faster than you expect
Most chains do not go dull from “cutting wood,” they go dull from what sneaks into the cut. A little dirt, sand, or a brush against the ground can round over the cutter edge quickly.
- Ground contact: the classic one, even a brief tap can take the bite off.
- Dirty bark and windblown grit: common with storm cleanup, downed trees, and firewood piles.
- Hitting metal: nails, fence wire, staples, old hardware, this can chip cutters and may require more than routine filing.
- Overheating from poor lubrication: a dry chain can blue the metal and lose edge quality.
According to OSHA, chainsaw work comes with serious cut and kickback hazards, so sharpening is not just “performance,” it is also about keeping the saw predictable and reducing the urge to force it through the wood.
Quick self-check: do you need sharpening, replacement, or a shop?
Before you grab a file, take 60 seconds to figure out what kind of “dull” you have. This saves a lot of frustration.
Signs you can usually sharpen at home
- Cutting slows down and you need to push.
- Sawdust looks fine and powdery rather than chunky chips.
- The chain still looks intact, no missing teeth.
- Cut starts straight but gradually wanders.
Signs a pro sharpening or replacement may be smarter
- Chipped or cracked cutters from hitting rocks or metal.
- Uneven tooth length from repeated one-sided filing.
- Chain at end of life, witness marks on cutters close to the top plate.
- Bar damage (severe rail wear) that keeps throwing off tracking.
If you are unsure, many hardware stores and small engine shops can quickly tell you whether the chain is still worth sharpening. That quick check often costs less than wasting time on a chain that will never cut right again.
Tools that make sharpening easy (and what to skip)
You can sharpen with a bare round file, but most people find consistency is the hard part, not the filing itself. A couple of simple guides keep your angles repeatable.
- Round file matched to chain pitch: common sizes include 5/32", 3/16", 7/32".
- File guide or filing jig: helps hold the correct top-plate angle and file height.
- Depth gauge tool (raker gauge): keeps the rakers set so the chain takes an appropriate bite.
- Flat file: used with the depth gauge tool.
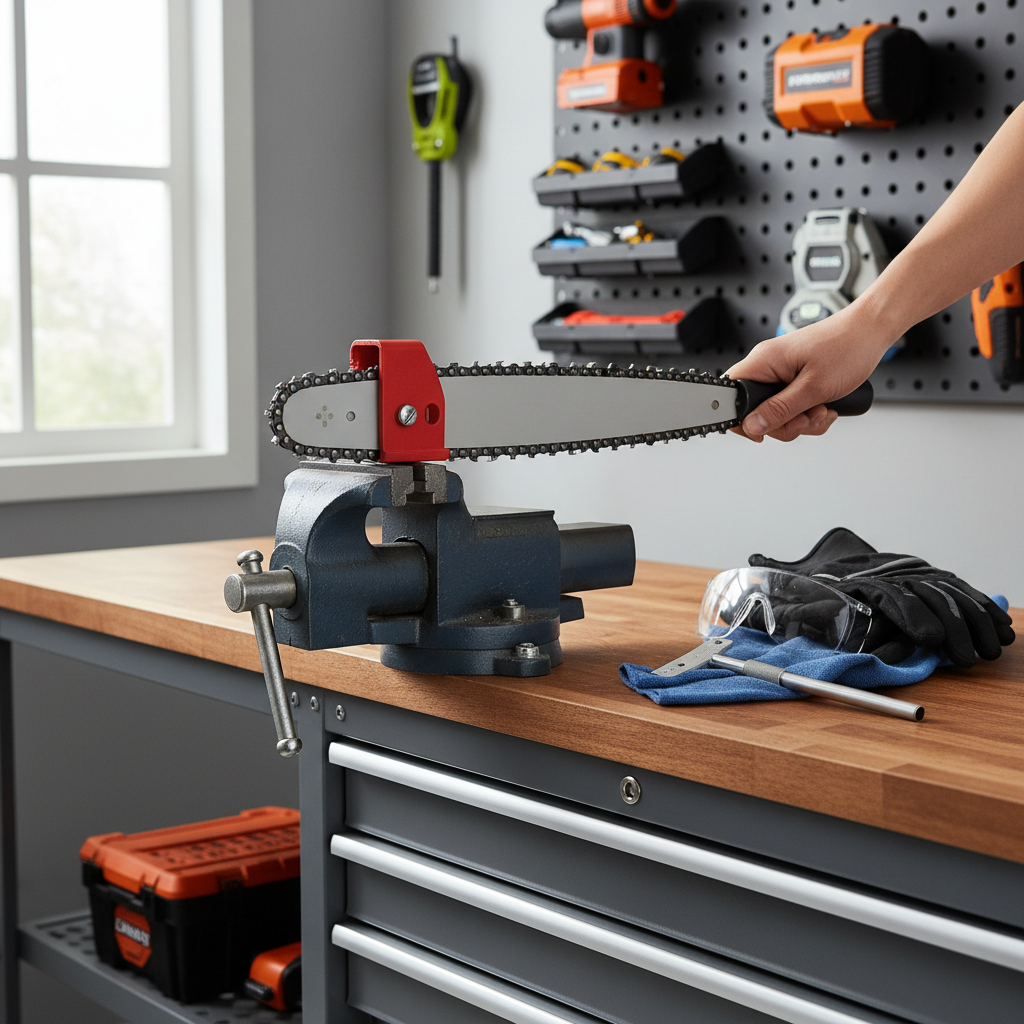
- Bar clamp or bench vise: stabilizes the bar so you are not fighting movement.
- Marker: for tracking your “starting tooth.”
What I would not overbuy early: pricey bench grinders if you only sharpen occasionally. They can remove too much metal fast if your setup or technique is off. Many homeowners get better results with a guide and a steady hand.

Step-by-step: how to sharpen a chainsaw chain easily with a round file
This is the repeatable home method. Aim for “same number of strokes, same angle, same pressure,” and you will get a chain that cuts straight again.
1) Prep the saw (and keep it safe)
- Turn the saw off, remove the battery on cordless models, or disconnect the spark plug boot on gas models.
- Engage the chain brake while you set up.
- Wear gloves and eye protection, a fresh edge can still cut you.
- Clamp the bar in a vise or use a bar clamp so the chain does not slide around.
2) Tension the chain correctly
A chain that sags will rock while you file, and your angles wander. Adjust tension so the chain sits snug to the bar but still moves by hand when the brake is off. If you are unsure, check your owner’s manual for the tensioning standard for your model.
3) Find your starting point
Pick one cutter, mark it with a Sharpie, and start there so you know when you have completed a full loop.
4) File the cutters on one side
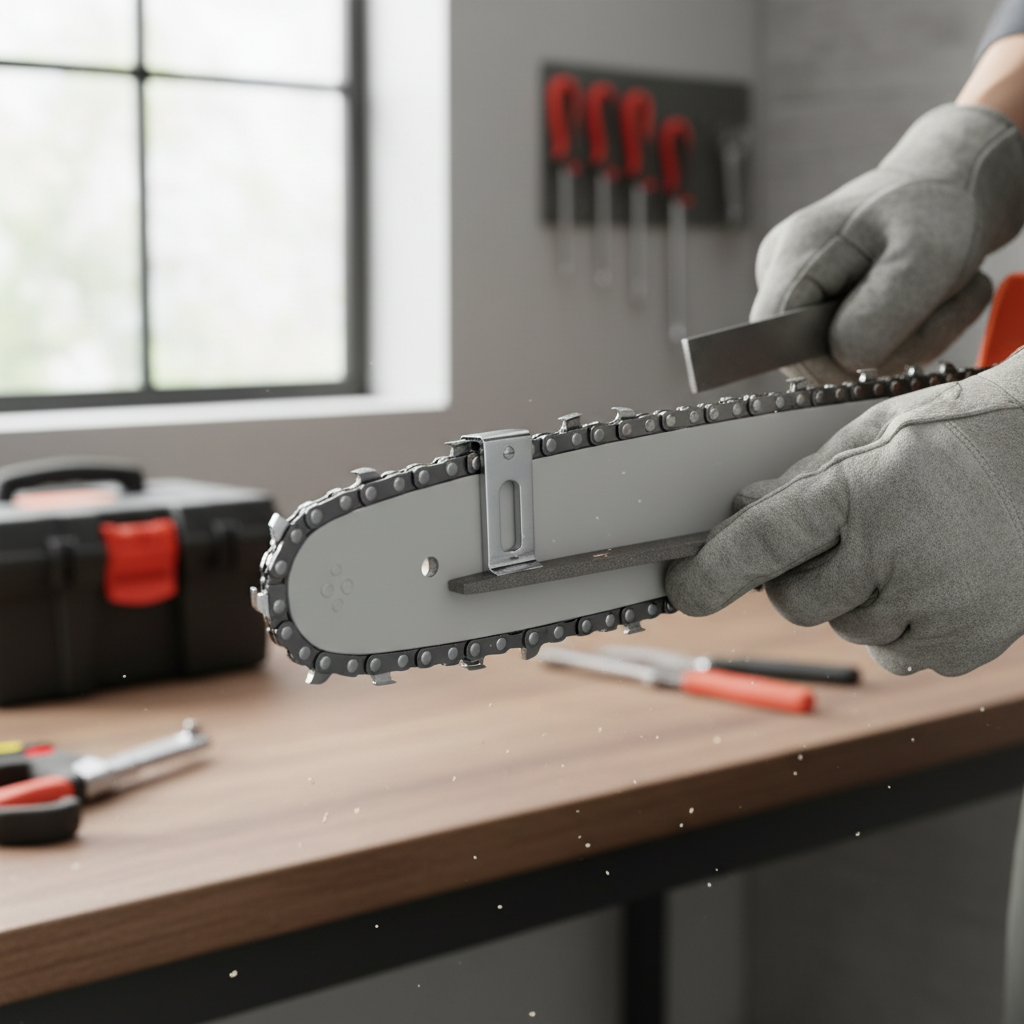
- Match the file diameter to the chain pitch, many chains have this info on the box or in the manual.
- Set the guide to the chain’s recommended top-plate angle, common angles are around 25–35 degrees, but it varies by chain type.
- File from the inside of the cutter to the outside, using smooth strokes.
- Use light, consistent pressure and the same number of strokes per cutter, often 3–8 strokes depending on dullness.
A practical rule: if one tooth is visibly shorter than the others, sharpen all cutters down to match that shortest one, otherwise the chain can pull to one side.
5) Rotate around and do the opposite cutters
Release the brake, advance the chain, re-engage the brake, repeat. When you switch sides, either move to the other side of the saw or adjust your body position so you can still file “inside to outside” without twisting your wrist.
6) Check your work by feel and look
- A sharp cutter edge looks clean, not rounded and shiny.
- The top plate should have a crisp corner where it meets the side plate.
- If the chain still feels grabby or inconsistent, you probably have uneven tooth length or rakers out of spec.
Do not skip the rakers: depth gauge basics (simple version)
People often learn how to sharpen a chainsaw chain easily, then wonder why it still cuts slow, rakers are the quiet reason. Rakers control how much wood each cutter takes. Too high and the saw makes dust and feels lazy, too low and the saw can chatter and increase kickback risk.
How to set raker height safely
- Place the depth gauge tool over the chain so the raker pokes through the slot.
- If the raker sits above the tool, file it down with a flat file until it is flush.
- Lightly round the front of the raker after filing, many guides recommend this to keep the cut smooth.
Follow the specification for your chain, because “just make them lower” can backfire. If you do not have the right depth gauge tool, it is usually worth buying before you start removing material.
Quick reference table: common home sharpening choices
Exact specs depend on your chain model, so treat this as a starting point and confirm with the chain packaging or manufacturer chart.
| Situation | What you do | Why it helps |
|---|---|---|
| Chain is dull but intact | Round file + guide, equal strokes per tooth | Restores consistent edge without removing excess metal |
| Chain pulls to one side | Compare cutter lengths, sharpen all to same shortest length | Balances left/right cutting forces |
| Dust instead of chips after sharpening | Check and adjust rakers with depth gauge tool | Restores proper bite depth |
| Hit dirt or light grit | Light touch-up, fewer strokes sooner | Prevents you from needing aggressive filing later |
| Hit metal or rock | Inspect for chips, consider shop grind or replacement | Avoids wasting time on damaged cutters |
Common mistakes that make sharpening feel “hard”
Most frustration comes from small inconsistencies. Fix these and the process gets boring in a good way.
- Wrong file size: too small digs, too large rides high and will not form the edge correctly.
- Freehand angle drift: the chain cuts crooked even if it feels sharp, a simple guide usually solves this.
- Uneven stroke count: one side ends up sharper or shorter, and the saw pulls.
- Ignoring rakers: cutters look sharp but performance stays poor.
- Sharpening a loose chain: file chatters, angles vary, you work twice as long.
If you keep running into the same mistake, slow down and do fewer teeth per session. A quick touch-up after every tank or battery change can be easier than “saving it” after several dull cuts.
When to get professional help (and what to ask for)
Home filing is great for routine maintenance, but some situations call for a shop, especially if safety or reliability matters for the job.
- If you see cracked or missing cutters, replace the chain and inspect the bar and sprocket.
- If the chain repeatedly dulls fast, ask a shop to check bar rails, sprocket wear, and oiling, a mechanical issue may be contributing.
- If you are working after storms near structures, tensioned wood can behave unpredictably, consider a certified arborist for complex removal work.
According to ANSI, chainsaw operators should follow manufacturer instructions and use appropriate PPE, if your setup, bar condition, or sharpening specs feel uncertain, a quick check with a qualified service technician is a reasonable call.
Key takeaways and a simple action plan
If you want how to sharpen a chainsaw chain easily to feel straightforward, prioritize consistency over speed, and treat rakers as part of the same job. A sharp, balanced chain cuts faster with less effort, which also helps you stay in control.
- Today: confirm your chain pitch, buy the correct round file and a basic guide.
- Next cut: sharpen at the first sign of dust or extra pressure, do not wait until it is miserable.
- Monthly or as needed: check rakers with a depth gauge tool and inspect bar oiling.
If you want, send your chain model number or a photo of the cutter markings, and you can usually narrow down the right file size and angle quickly before you start filing.